Help
How To Use the Front Page
First Time User? Please review and Accept our Cookie Policy. This consent will only need to be given once.

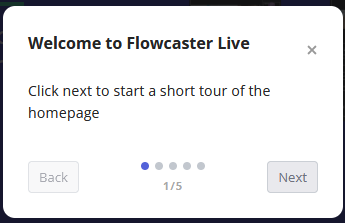
Want some more details about FlowCaster.live? You can Take the Tour! We have put a short tour together to point out the main features of the site. The Tour can be closed by clicking the x in its window.
Once you have agreed to start using the site, you will either need to Sign In and start a meeting, or click on a session link you received to Join a meeting.

To sign in, click the Sign In/Sign Up button. A dialog opens to let you sign up and log in using your Google, Facebook, Twitter, Email, Phone, or Apple account details.

To start a meeting, click the New Meeting button, or enter text into the edit box and click Create. This opens the flowcaster.live Collaboration Site
Help
The Main Areas of the Collaboration Site
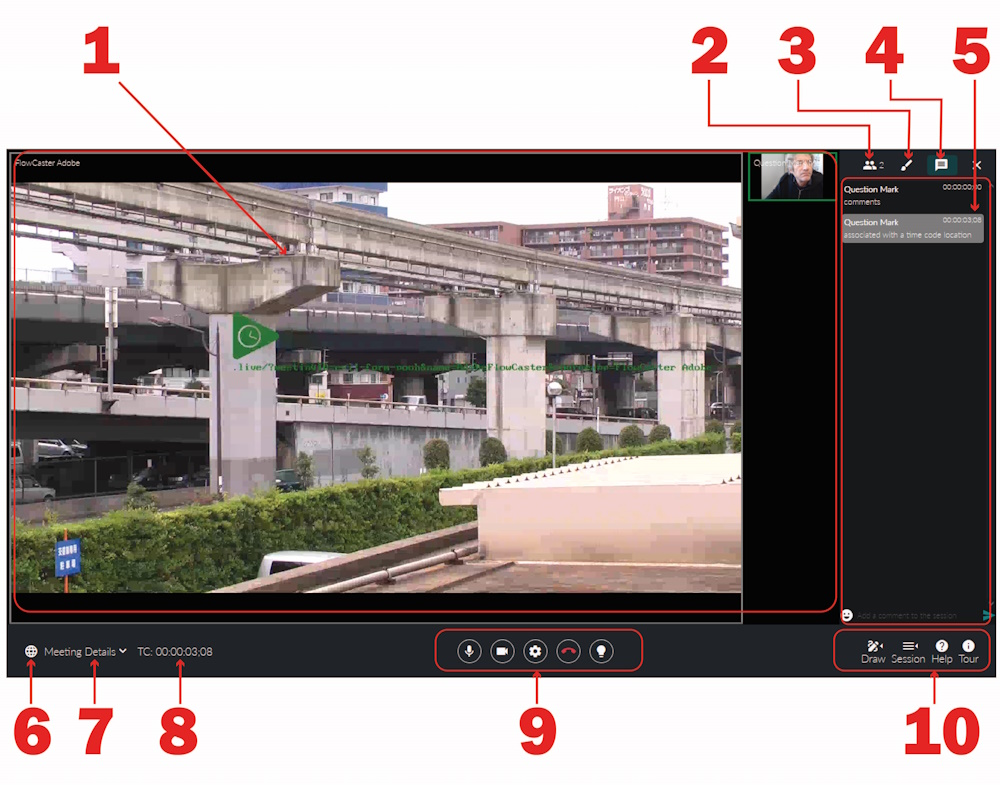
There are ten main areas within the flowcaster.live collaborative review site:
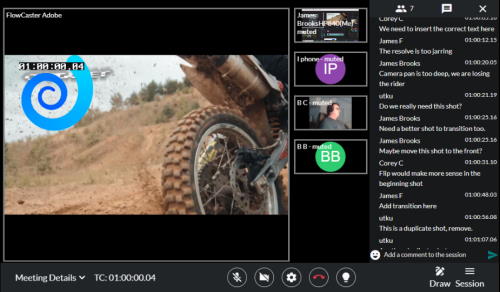
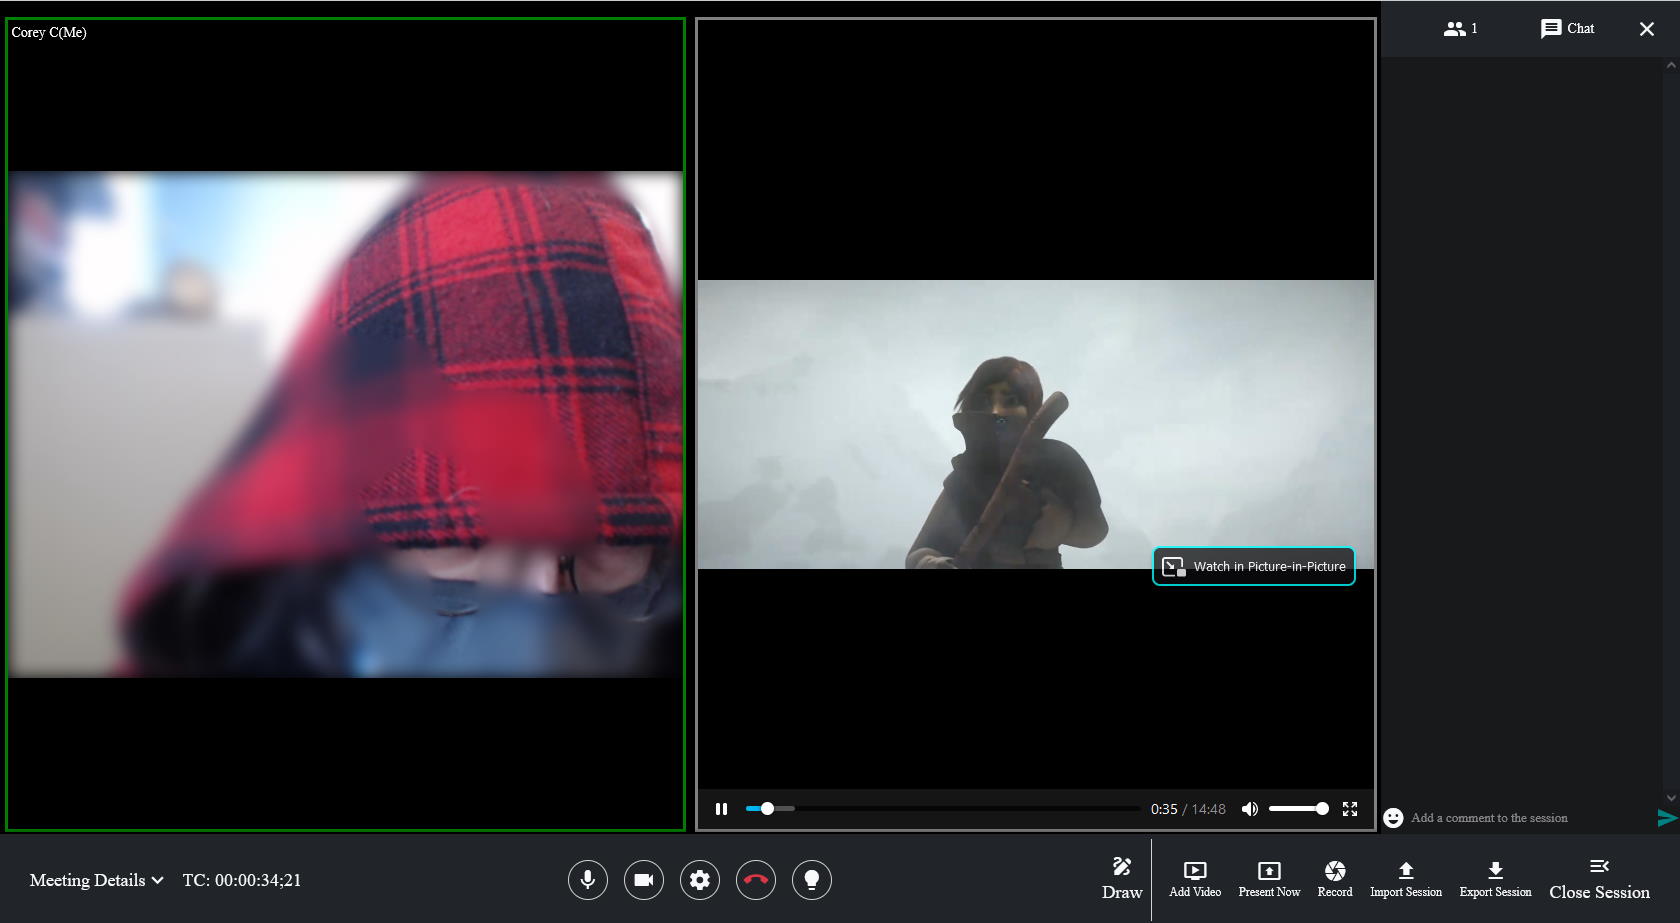
- The Main Screen, which provides a window for each participant in the session. With the FlowCaster plugin, the output of an Adobe/Avid/Resolve editor can be displayed as a participant. Clicking on a window resizes the window, making a small window larger or vice versa.
- The Participants tab, which opens the participants panel.
- The Telestration tab, which opens the telestration panel.
- The Comments tab, which opens the comments panel.
- The Display Area this area displays either the comments, the drawing details, or the participants, depending on which one is selected, along with their time code or time of day.
- The Alternate Language selector. Currently English, French, Italian, Spanish, German, Japanese, Korean, and Chinese are supported.
- The Session Details area. The session link can be copied here.
- The Time Code display from the editor if present
- The Main Controls Microphone on/off, Camera on/off, Configuration, Hang up (leave call) and light/dark mode selector
- The Drawing Tools, Session tools, and Help selectors. Click to expand the drawing tools, or click to expand the session tools. Clicking the Help button opens this help page.
Help
How To Use the Flowcaster.live Site
-
What do I need to get started?
You don't need to install anything to join a meeting. Depending on your workflow, you may want to download and install the FlowCaster Tools. You will need a device capable of accessing the internet, such as a computer, tablet, or smartphone.
• We recommend you have an audio input device such as a microphone or headset so people can hear you in the group chat.
• We recommend you have an audio output device such as a set of speakers or a headset/headphones so you can listen to the group chat.
• We recommend you have a video input device so other people can see you on the group webcam. A common USB web camera should be fine.
-
How Do I Set Up An Account and Start FlowCasting?
To create a session and invite other people, you will need to be signed in to an account. To join a meeting, you should be able to simply click a link.
Setting up an account is a simple process - here's how:
Press the Sign In/Sign Up button on the upper right.

You will be prompted to sign in to your account, or create an account and then sign in. To create an account, you can use either your Google, Facebook, Twitter, Email, Phone, or Apple credentials. The dialog will also ask for your First and Last name, and a password. Note: Adobe only supports Email and Phone sign in for use of the Live Review Panel.

Once you have signed in, press the New Meeting button. This opens the session space, and you will be prompted to enter a user name for the session. This is the name other participants will see on your webcam view. The name field will work with any text you care to type in, but it cannot be left empty.

-
How Do I Set Up My Audio and Video Devices?
Once you have joined a session, you will want to set up your audio and video input and output devices.
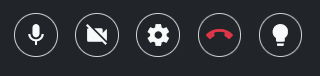
Click the Gear icon from the main controls along the bottom of the screen to open the Configuration menu.
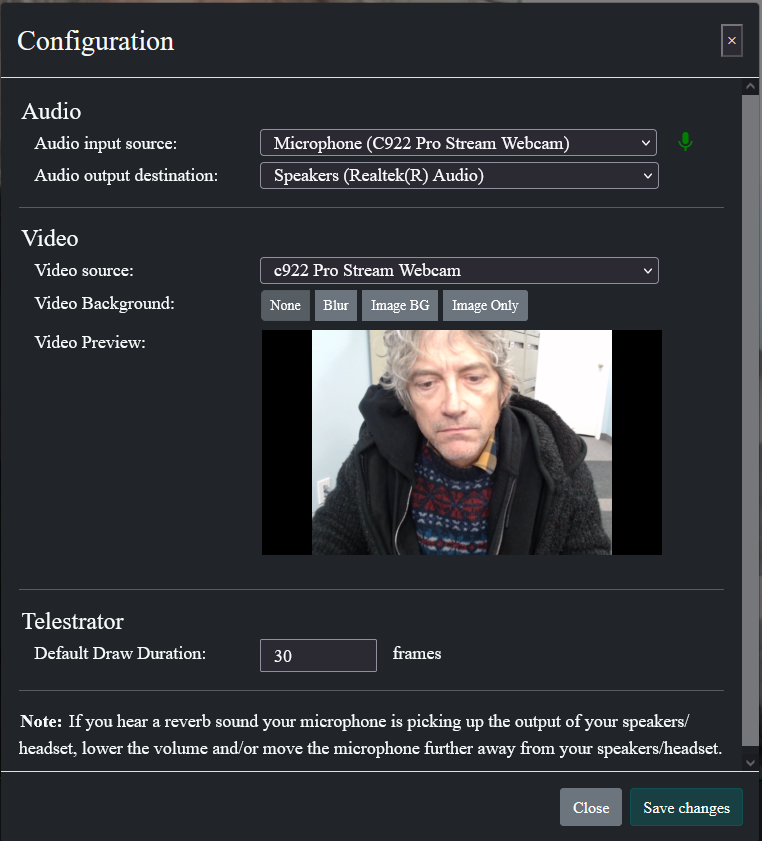
Use the Audio input source pulldown to select the audio input device you want to use. The list will be populated with all of the audio sources detected. You may be prompted to allow flowcaster.live to access the audio input device.
Use the Audio output destination to select how you want to listen to the audio. The list will be populated with all of the audio output devices detected.
Use the Video source pulldown menu to select your video input device. The list will be populated with all of the video sources detected. You may be prompted to allow flowcaster.live to access the video input device.
You can use the switch labelled None to show the image unprocessed.
You can use the switch labelled Blur to blur the background. This setting looks for a human form and blurs out the background.
You can use the switch labelled Image BG to add an image to the background. This setting looks for a human form and substitutes the image for the background.
You can use the switch labelled Image Only to show an image instead of any video input.
To confirm that the video input has been set up properly, there will be a Video Preview of what your video input is sending.
Telestrator Default Draw Duration - The default duration for telestration to be displayed is shown here, and can be reset by typing in a new value. The setting is number of frames, so 30 frames would display a drawing for one second in a 30fps signal.
The camera may still be off. You may simply be able to click the camera icon to turn it on.

The microphone may still be off. You may simply be able to click the microphone icon to turn it on.
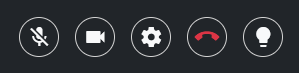
It may be useful from time to time to turn the microphone off as a mute when you are not speaking, to keep the session audio clean.
Note: If you are hearing a reverb sound, or feedack, the microphone may be picking up the output of your speakers or headset. You can click the microphone icon to mute your audio while you move the audio output further away from the input, and/or lower the volume.
-
How Do I Invite People or Join a Session?
You can invite other participants to the session for their input.
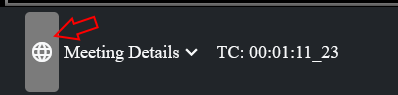
Click on the Meeting Details button.
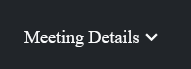
This opens the Meeting Details tab, with a link you can copy.
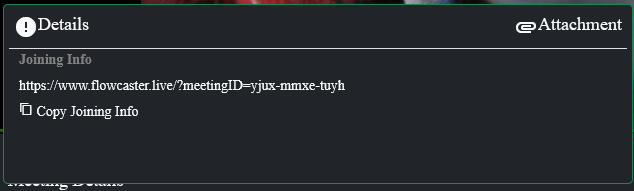
Copy the link by pressing the Copy Joining Info button. You can also copy the link directly from your browser bar. Send the link to other participants.
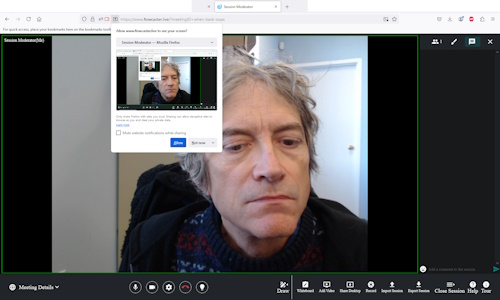
They can then click on the link you sent to open the flowcaster.live site. To join the session they will each need to enter a name, and set up their audio and video devices.
Here is an example where John Smith has opened a new session.
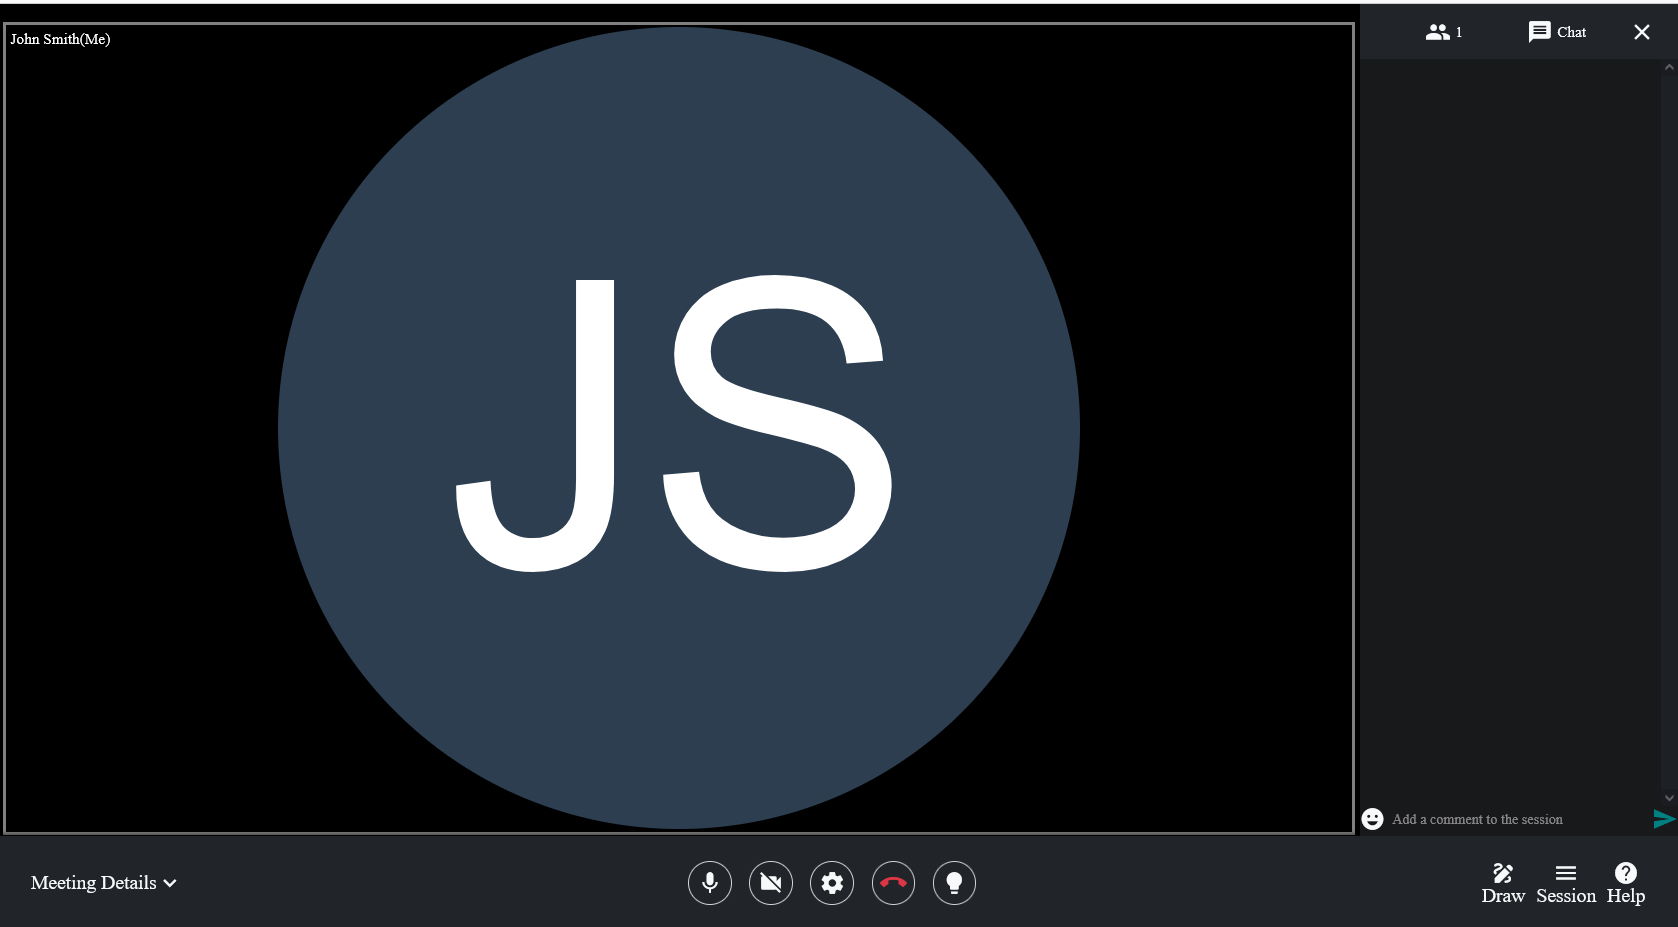
John's initials occupy the webcam area, as no video device has been set up. In the upper right above the chat area, 1 person is now present in the session.
Note: If one person has been designated as an Administrator (see the "How Do I Set or Remove Privileges for Participants" section below for details), each participant will need to be approved by the Administrator before they can join the session.
-
How Can I Send My Adobe Editor via flowcaster.live?
A licensed install of the FlowCaster plugin is required for this feature to work. FlowCaster software can be purchased separately. It is also provided for users with a valid FlowCaster.live support package.
FlowCaster creates a virtual I/O board as a transmitter for Adobe creative software like Premiere and After Effects.
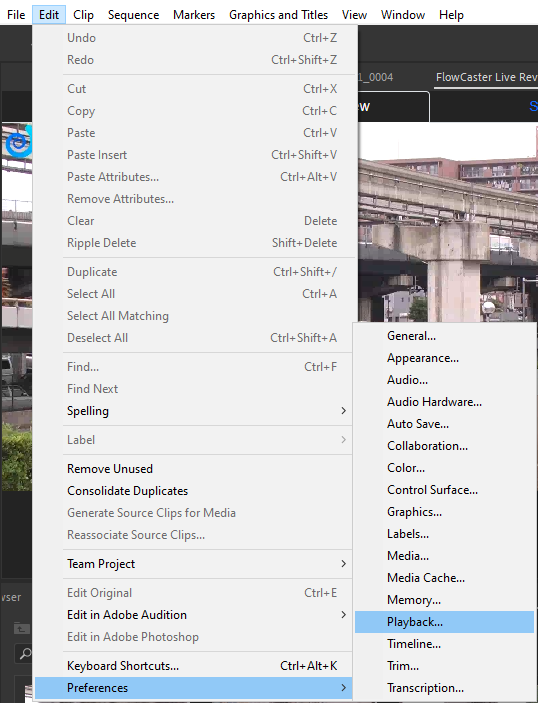
To configure FlowCaster in Adobe Premiere, access the Playback area or Preferences. On Windows, it is the Edit | Preferences | Playback menu. For macOS, it is the Main | Preferences | Playback menu.
This will bring up the Playback settings in the Preferences panel. To use FlowCaster, you will want to set the Audio Device to FlowCaster Transmitter, as well as checking the checkbox next to FlowCaster Transmitter in the Video Device list.
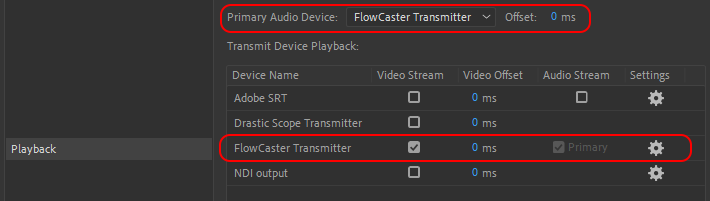
This will cause Adobe to use FlowCaster as its output board. To configure FlowCaster, click on the Setup link in the Video Device list next to the FlowCaster Transmitter entry. That will bring up the FlowCaster Configuration dialog.
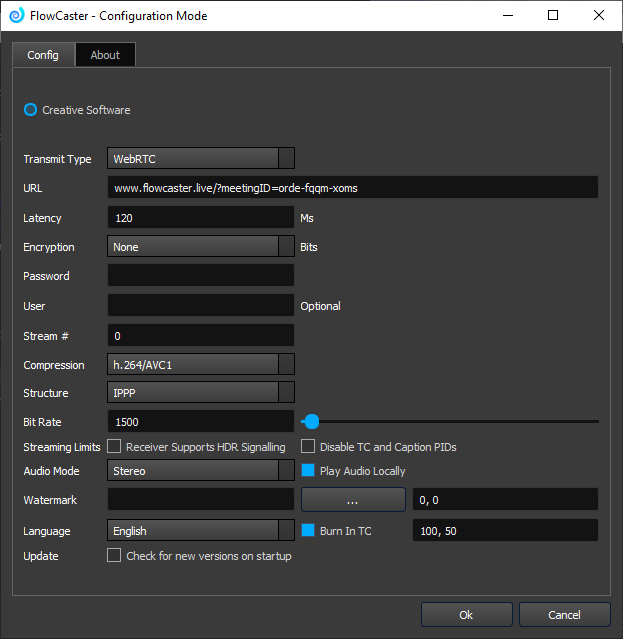
Flowcaster.live uses WebRTC to receive video from Premiere.
Select WebRTC as the Transmit Type
Paste the meeting URL into the URL field
Optionally you can adjust the latency, apply encryption, set a password, and burn in time code.
Check the Play Audio Locally checkbox if you'd like to hear the audio locally.
Press the OK button to set your changes.
The editor will open up in the session as a new participant, and flowcaster.live will display the editor's time code.
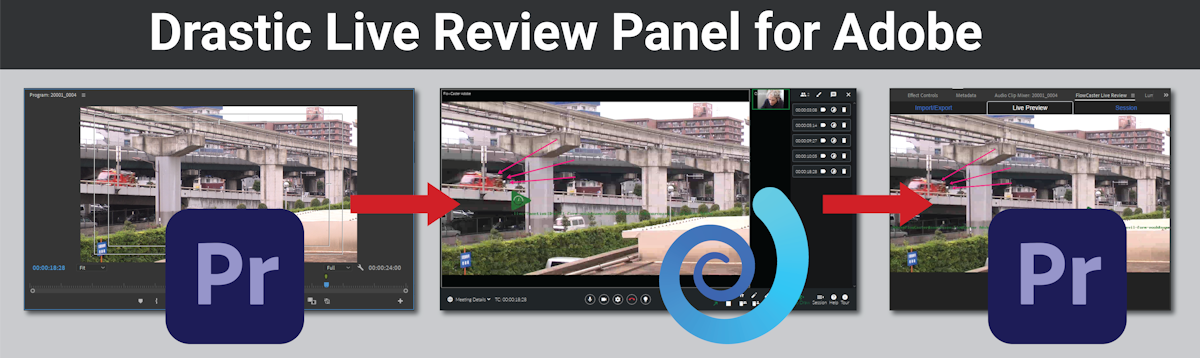
Using the Adobe Live Review Panel
The FlowCaster Live Review Panel is an Adobe CEP Extension Panel, a web application running within the context of Adobe Creative Cloud apps using a stack of technologies known as CEP (Common Extensibility Platform).
The panel is available through the Adobe Exchange, at the following link: https://exchange.adobe.com/apps/cc/108802/flowcasterlive.
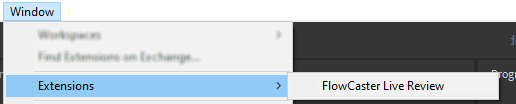
In Adobe, load the panel from Windows | Extensions | FlowCaster Live Review.
You will be prompted to sign in with your email or gmail. Click on the Session tab, and enter the Meeting ID (everything in the URL after the equals sign) to Join the session. Click the Live Preview tab to view the session directly in Adobe Premiere. In the example below, the timeline is being sent to FlowCaster, where a watermark has been specified. The live session appears in Premiere, where the user can see any drawings that have been made in the session.
-
How Can I Send My Avid Editor via flowcaster.live?
FlowCaster creates an Open I/O board in Avid creative software like Media Composer.
To configure FlowCaster in Avid Media Composer, you first have to enable it on the timeline. Find the Open IO output button just above the timeline.

To enable it, right click on it and select FlowCaster. If FlowCaster is already selected, you can just left click on the button.
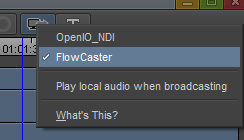
Once enabled, the button will flash a red double arrow to indicate it is sending to FlowCaster.

When enabled, a new menu under Tools will be available called Video Output Tool.
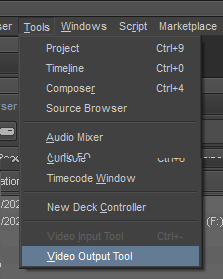
Click on this to bring up the FlowCaster Configuration Dialog.
Flowcaster.live uses WebRTC to receive video from Avid.
Select WebRTC as the Transmit Type
Paste the meeting URL into the URL field
Optionally you can adjust the latency, apply encryption, set a password, and burn in time code.
Check the Play Audio Locally checkbox if you'd like to hear the audio locally.
Press the OK button to set your changes.
The editor will open up in the session as a new participant, and flowcaster.live will display the editor's time code.
-
How Do I Use the Whiteboard?
Flowcaster.live provides a whiteboard so the user can load an image to discuss, and add drawings to. Press the Session button to expand the Session tools.

Click on the Whiteboard button to add the whiteboard as a participant.
It may open as a small chip. Click on it to enlarge it.
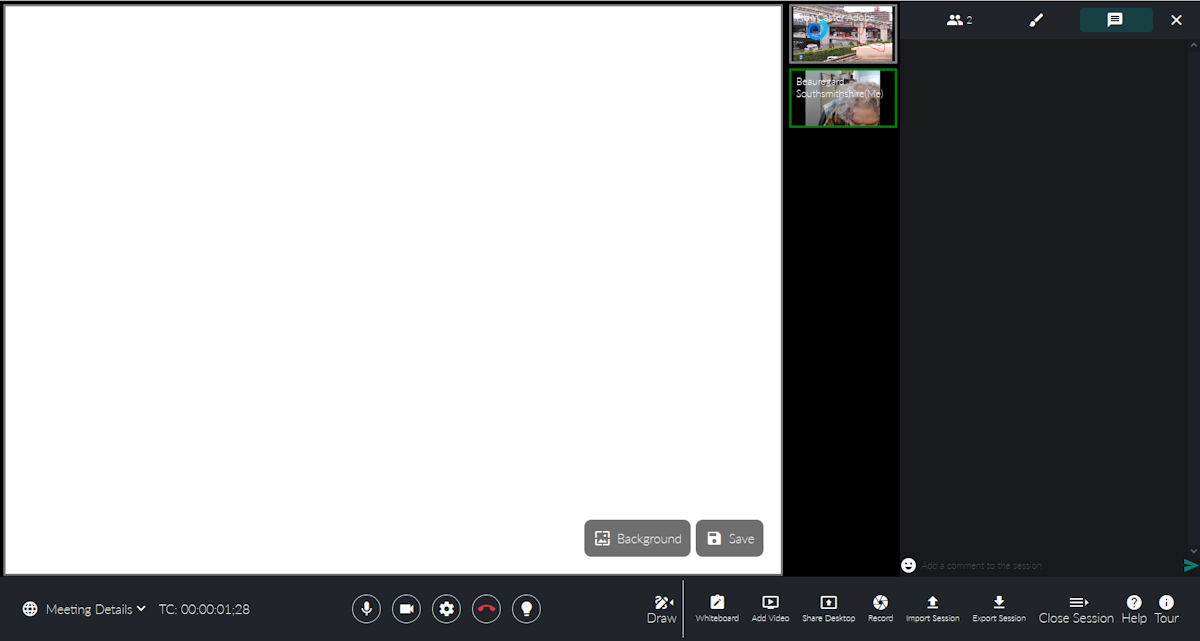
Once loaded, the user may use the drawing tools to draw on it at any time. Two options are immediately available: Background, and Save.
Background opens a browser, so the user can browse to and select an image to display.
Save immediately saves the current whiteboard as a .png to the user's download folder.
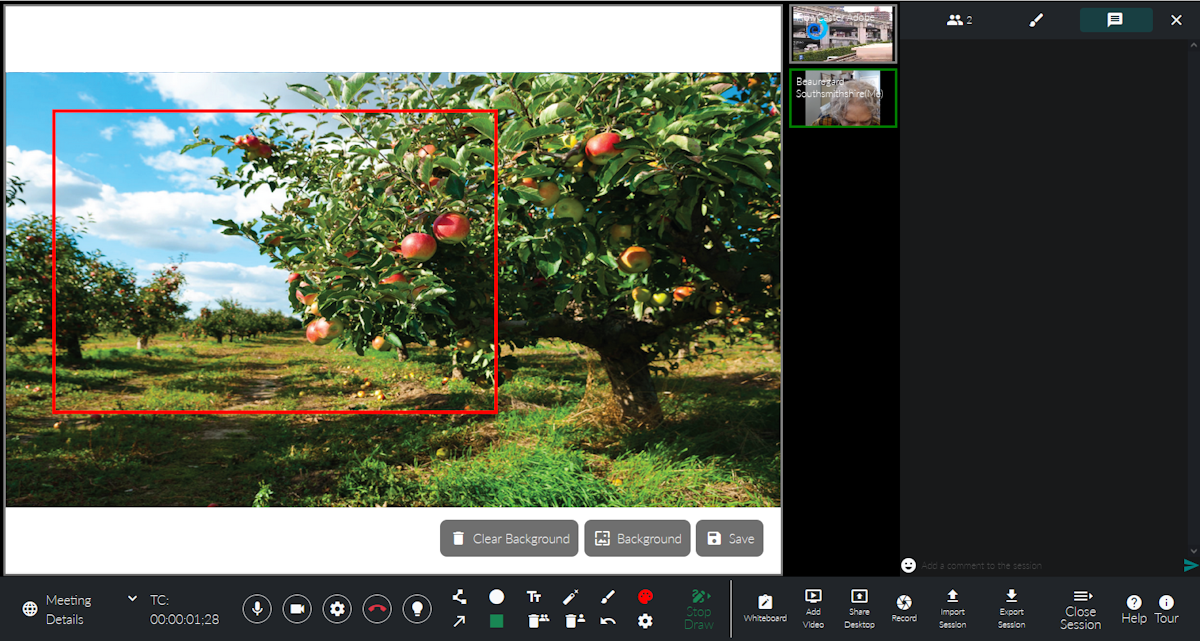
With an image loaded, the user will now be able to click Clear Background to remove the loaded image. Note that this does not remove the Drawings. To remove the drawings from the Whiteboard, click the Draw button to open the Drawing tools, and click the Clear All Drawings button to clear all the drawings.
-
How Do I Play an Existing File via flowcaster.live?
The Add Video dialog lets the user load a video for playback. Press the Session button to expand the Session tools.
Click the Add Video button to open the add video dialog.

The Frame.io button opens the Frame.io login, so the user can log in and navigate to their Frame.io video assets.
The Add Video button currently reveals any videos that have been stored on the FlowCaster.live server. For a client hosted server, this would provide access to their internal files.
The Add Live Video button lets the user load a live IP stream as a participant in the Session.
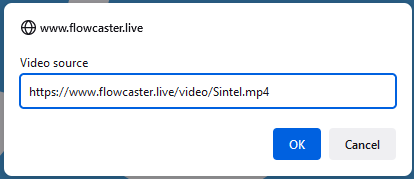
Once loaded, the video will open in a new screen within the session, so all participants can view it.
-
How Do I Share a Window on my Desktop?
FlowCaster.live can send an open application on your desktop as a participant in the session.
Press the Session button to expand the Session options.

This button opens the Session tools.
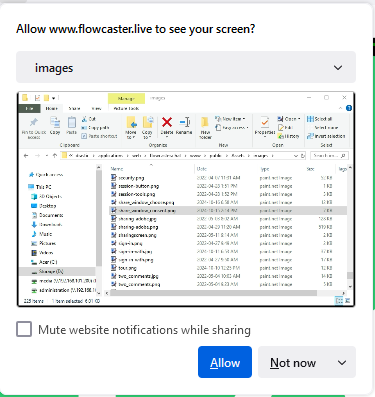
Click on the Share Desktop button. This opens a dialog so you can select an application and allow it to be shared.
To share a window you will need to select an active application from the pulldown menu.
Once it has been selected, the Allow button becomes active and it can be clicked to start sharing.
When you are sharing a window, it replaces any webcam or video source being sent on the tab. The Share Desktop button turns into a Stop Sharing Desktop window, and a Stop Sharing dialog is also provided to remove the window and return the webcam.

-
How Do I Import Session Markers for Review?
You can import session markers into FlowCaster.live for further review, and to add feedback to the session.
Press the Session button to expand the Session options.
This button opens the Session tools.
Click the Import Session button to reveal the Import Session options.

Select the type of session you want to import.
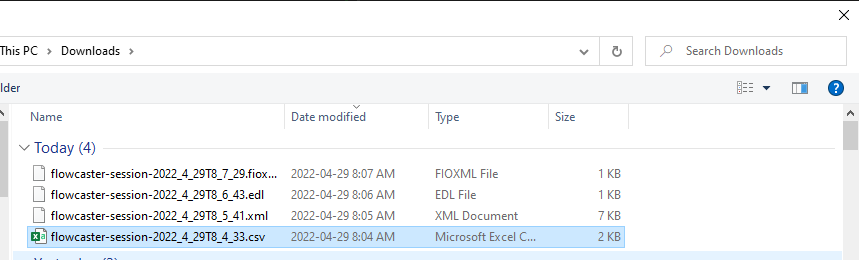
If you have exported a Drastic-Adobe session, you will be looking for a CSV file in your downloads, or wherever it has been saved.
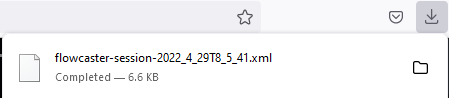
If you have exported an Avid session, you will be looking for an XML file in your downloads, or wherever it has been saved.
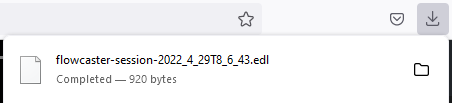
If you have exported a Resolve session, you will be looking for an EDL in your downloads, or wherever it has been saved.
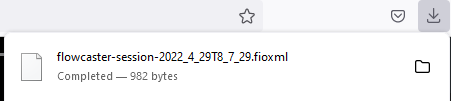
If you have exported a Frame.io session, you will be looking for an fioxml file in your downloads, or wherever it has been saved.
-
How Do I Export a Session Markers File for Editors?
FlowCaster.live can save the session so the comments and drawing feedback can be opened as a markup file in an editor.
Press the Session button to expand the Session options.
This button opens the Session tools.
Click on the Export Session button to reveal the Export options tab.
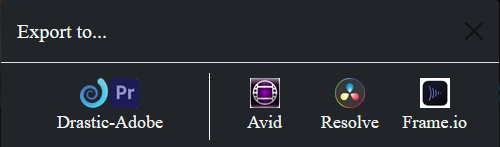
FlowCaster.live can export files for Drastic-Adobe, Avid, Resolve, and Frame.io.
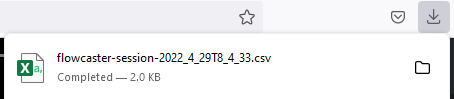
When Drastic-Adobe is selected, a CSV file is immediately saved into your downloads folder. These session markers files can be imported to FlowCaster.live, or into an Adobe editor.
When Avid is selected, an XML file is immediately saved into your downloads folder. These session markers files can be imported to FlowCaster.live, or into an Avid editor.
When Resolve is selected, an EDL file is immediately saved into your downloads folder. These session markers files can be imported to FlowCaster.live, or into a Resolve editor.
When Frame.io is selected, an fioxml file file is immediately saved into your downloads folder. These session markers files can be imported to FlowCaster.live, or into a Frame.io project.
-
How Do I Record the Session for Later Review?
You can record everything that is happening in FlowCaster.live during a session to watch at a later date. Press the Session button to expand the Session options.
This button opens the Session tools. Click on the Record button to set up the recording.
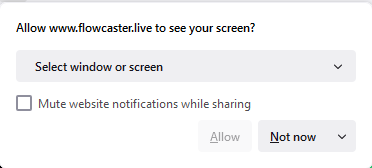
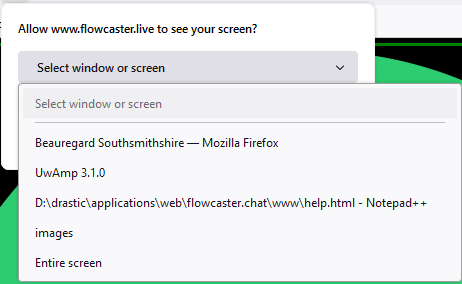
This brings up a dialog to confirm the window or screen you want to present. Use the pulldown menu to select between available options.

Select the window you want to present. Press the Allow button. Or you can press the Block button if you want to disallow screen sharing. There is an option to mute sharing notifications.
If you have pressed the Allow button, the premission window will close, the Record Now button will turn red, and all the other participants see the selected window or active application from your desktop in your webcam area.

A tiny window sits on top to remind you that you are sharing your screen. A Stop Sharing button is provided so you can stop sharing your screen at any time.

At some point you will be finished recording. Press the Stop button. You will be prompted to name the video you have recorded.
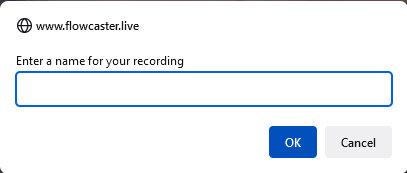
The video will immediately be downloaded onto your computer as a Webm file, which opens easily in most players.
-
How Do I Add and Edit Comments and Emoji in the Chat Area?
The comment area allows all participants to have a shared text and emoji conversation. Each comment or emoji is displayed in sequence in the chat area, along with time code matching the video being reviewed. When the file is played back, comments and emoji will be briefly highlighted when playback moves through the time code location at which the comment or emoji was made.

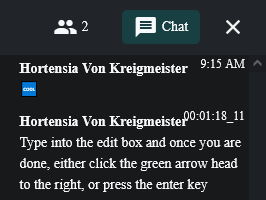
To enter a comment, type your comment into the edit box, and once you are done, either click the green arrow head to the right, or press the enter key.
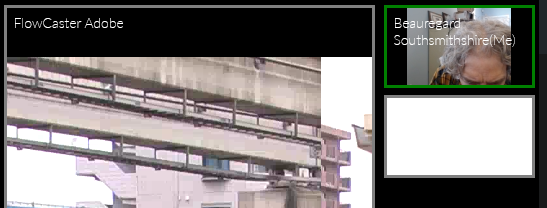
The below image shows a chat area with two comments. The first, an emoji, is marked with time of day, as no editor was set up. The second comment is marked with time code, since by that time an editor was sending video along with time code.
To edit a comment, you can hover over the comment to reveal the edit options.
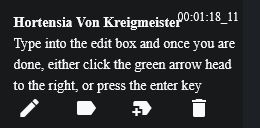
From left to right, the options are:
Edit Message - the comment box becomes active with your text, so you can edit it and keep your comments tidy. If you edit the comment by removing all the text, and press enter, it will be deleted.
Modify Time Code - an edit box comes up with the time code so you can change the time code location of the comment. The time code must be replaced with valid SMPTE time code.
Add Current Time Code - replaces the time code of your comment with the current time code location
Delete Comment - removes the comment from the chat area
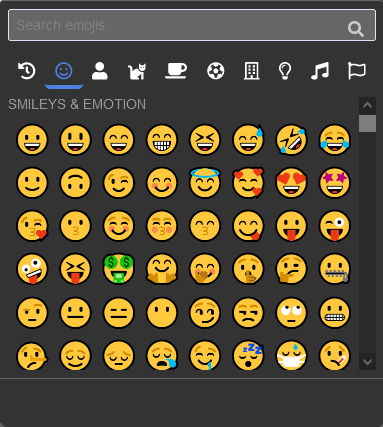
To add emoji, click on the happy face icon at the left of the comment bar. This reveals emoji options. Select one by clicking on it. Then press enter, or click on the green arrow to add the emoji to the chat area.
To edit an emoji, you can hover over the emoji to reveal the edit options.
From left to right, the options are:
Edit Message - the comment box becomes active with the emoji, so you can replace it, and/or add other emoji. If you edit the emoji by removing everything, and press enter, the entry will be removed from the chat area.
Modify Time Code - an edit box comes up with the time code so you can change the time code location of the emoji. The time code must be replaced with valid SMPTE time code.
Add Current Time Code - replaces the time code of your emoji with the current time code location
Delete Comment - removes the emoji from the chat area
-
How Do I Draw and Add Visual Feedback to a Session?
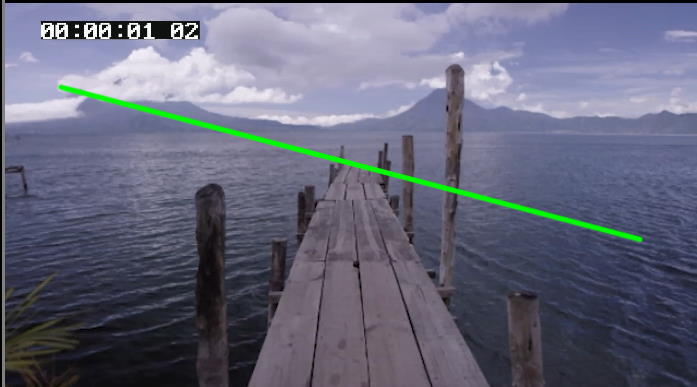
You can draw (or type) directly on the video being reviewed, using the set of drawing tools detailed below. For the drawings to persist, the video being reviewed should be in pause mode. Drawings are set by default to display for 30 frames during replay, unless interrupted by a new drawing, or the duration has been edited.
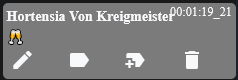
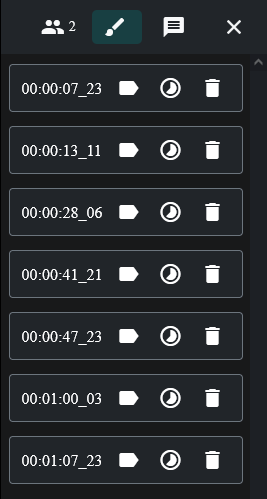
As each drawing is made, it shows up in the Display Area, provided the drawings section is selected. Each drawing displays the time code location of the drawing (in cases where an editor is sending time code), or the time of day. There is also a button to edit the time code location, a clock icon to edit how long the drawing is displayed, and a trash can icon to delete the drawing.
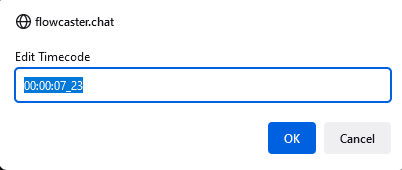
Clicking the button to edit the time code opens a dialog with the current time code displayed. You can edit the time code value and press the OK button to change it.
To begin drawing, click the Draw button.
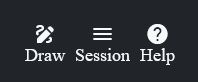
This button opens the Drawing tools.
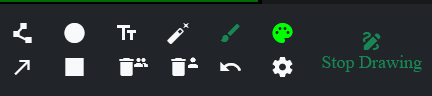
Click the line icon to begin drawing lines in the session.
Click the circle icon to begin drawing ellipses in the session.

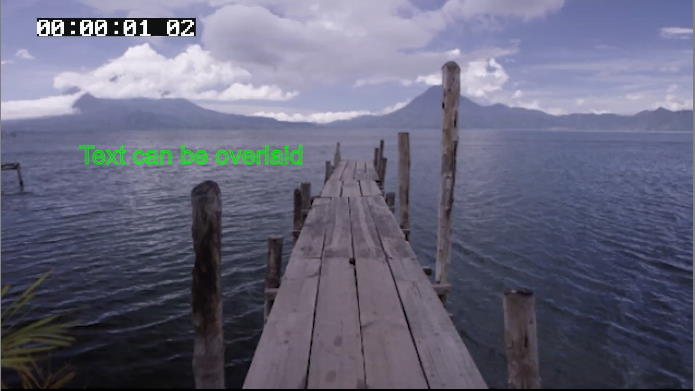
Click the Tt (text) icon to begin writing text directly on the image.
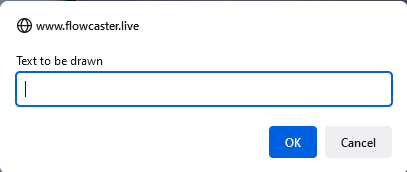
Once you type in the text and press OK, it will show up on the session.
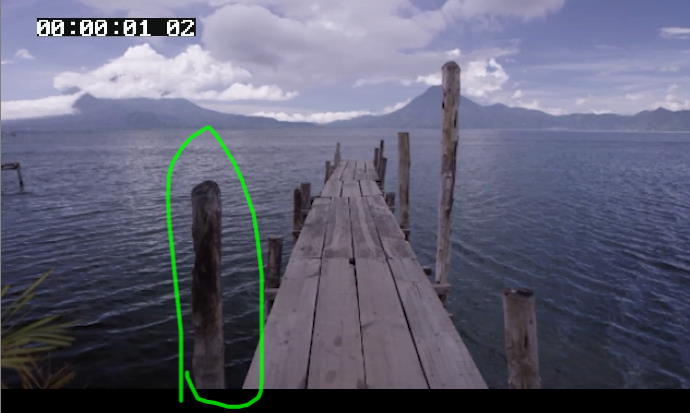
Click the brush icon to begin drawing freehand in the session.
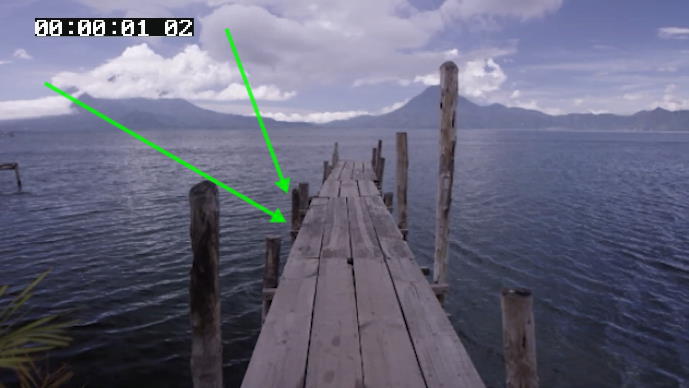
Click the arrow icon to begin drawing arrows in the session.
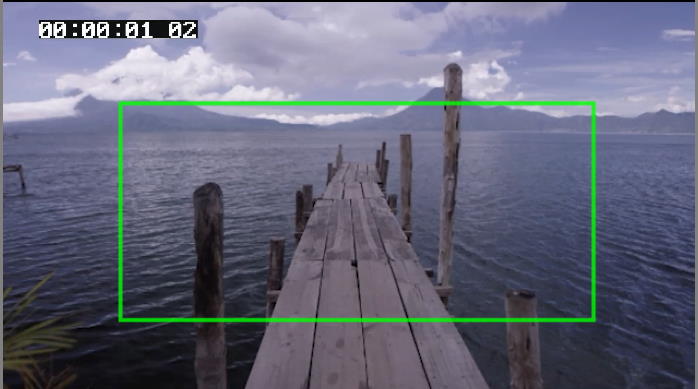
Click the square icon to begin drawing rectangles in the session.
Click the crowd trash icon to erase everybody's drawings in the session.

Click the single person trash icon to erase the drawing that you have made in the session.

Click the back arrow icon to undo the last drawing etc. you have made in the session.

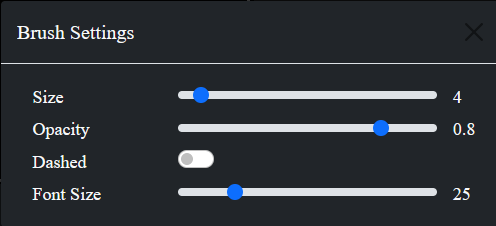
Click the gear icon to adjust brush size, opacity, solid/dashed line setting, and font size.
Click the pallette to change the color you are using to draw with. A color picker opens, and the user can select from standard colors, or create a custom color.

-
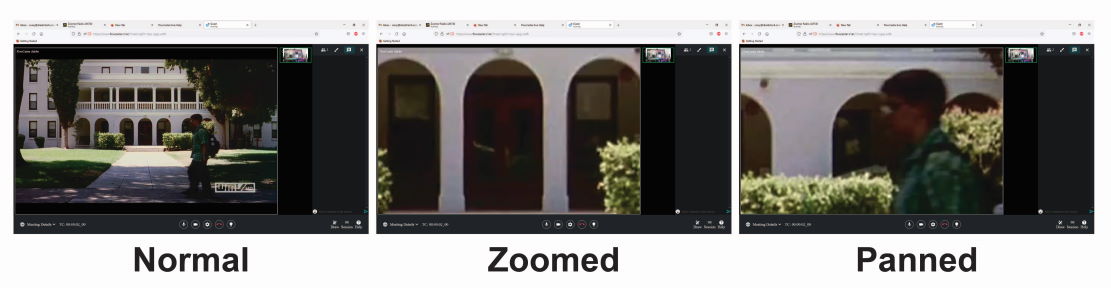
How Do I Zoom and Pan the image to view specific areas?
During clip or stream review, it can be handy to zoom in on a specific detail. The zoom and pan features are controlled by the mouse.
Use the scroll wheel to zoom in and out. Use the right mouse button to move the image around, or pan. Clicking on the scroll wheel will reset the image to normal view.
-
How Do I Set FlowCaster.live to use an Alternate Language?
The Flowcaster.live site has been translated into several languages, and is designed to automatically set itself to the language the system is set to use.
However, there may be cases where the user is more comfortable working in another supported language.
Click the globe in the lower left corner of the site
A list of available languages will be displayed. Currently English, French, Italian, Spanish, German, Japanese, Korean, and Chinese are supported. Clicking on one will reset the interface to use the new language.

Here is a portion of the interface in German

-
How Do I Set or Remove Privileges for Participants?
Each of the participants is displayed with an icon and their name in the chat area. If no Administrator has been set, each participant will also have three dots and a pin. If an Administrator has been set, only the Administrator will see the three dots and a pin.
Click the three dots icon to reveal available options for that participant.
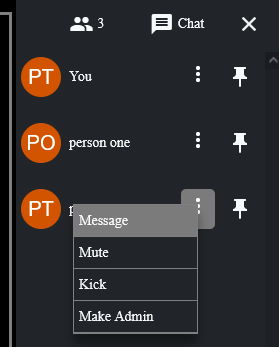
Participant Options
Message - add a text comment or emoji which only the selected participant can see.
Mute - turn off the audio from a specific person's webcam, useful if the person is temporarily away from the screen and their audio is providing a distraction.
Kick - remove the participant from the session.
Make Admin - make one person the Administrator. When a session has an Administrator, only that person would see the three dots and the pin for other participants. An Administrator would also need to approve each participant as they seek to enter the session.
Pin - Click the pin to the right of a particpant to keep that participant at the top of the chat area.
-
How Do I Use the FlowCaster Live Review Panel in Adobe?
Drastic Technologies has provided tools and solutions for Adobe editor workflows for decades, and expands on this relationship by making the FlowCaster Live Review Panel widely available. The panel is available for free, and provides additional Drastic related features in a dockable panel within Adobe editing software.
The FlowCaster Live Review Panel is an Adobe CEP Extension Panel, a web application running within the context of Adobe Creative Cloud apps using a stack of technologies known as CEP (Common Extensibility Platform). The panel provides real time feedback between Adobe editors (Premiere, After Effects etc.) and Drastic applications such as videoQC, MediaReactor, and FlowCaster. We have submitted the panel for Adobe review, but in the meantime you can still install the panel and add these features to your workflow.
The Adobe CEP Extension Panel is currently available as a ZXP file. A ZXP file is an extension that adds additional capabilities to an Adobe software program, such as Adobe Premiere or After Effects. The download link for the panel is as follows:
https://www.drastic.tv/downloads/flowcaster/live.flowcaster.zxp
To install this file you will need to use an installer designed for ZXP files, such as ZXP Installer. Using this particular installer is a straightforward process:
Go to the website at https://aescripts.com/learn/zxp-installer/, and download the appropriate install for your operating system. When you run it, it will look something like this:
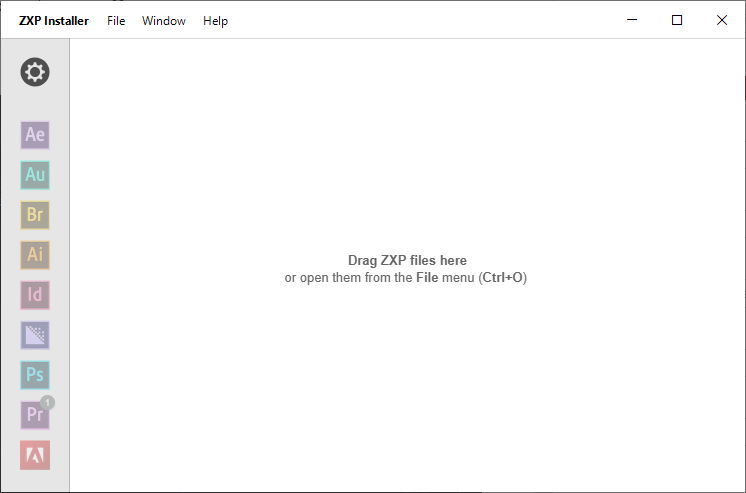
Drag the ZXP file onto the Installer, or use the File | Open (Ctl+O) menu option to select and run the install.
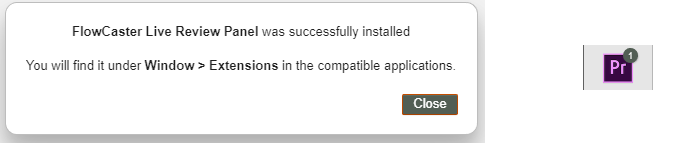
A successful install will produce the below message, and activate the Premiere chip in the installer.
FlowCaster Live Review
FlowCaster Live Review workflow lets you sign in to a session, and view the session directly in Adobe Premiere, without needing to go back and forth between the editor and the website. The following instructions assume you have installed FlowCaster tools from www.flowcaster.com.
With Premiere running and the panel open, go to the Flowcaster.live website, sign in, and start a session.
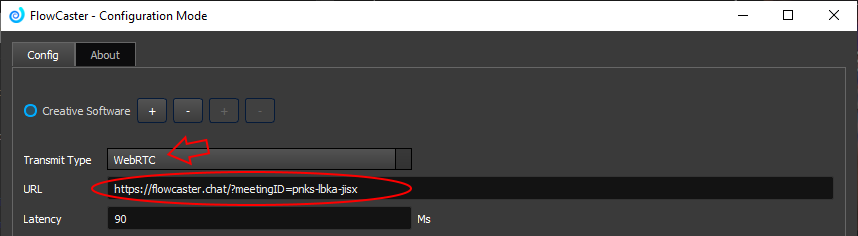
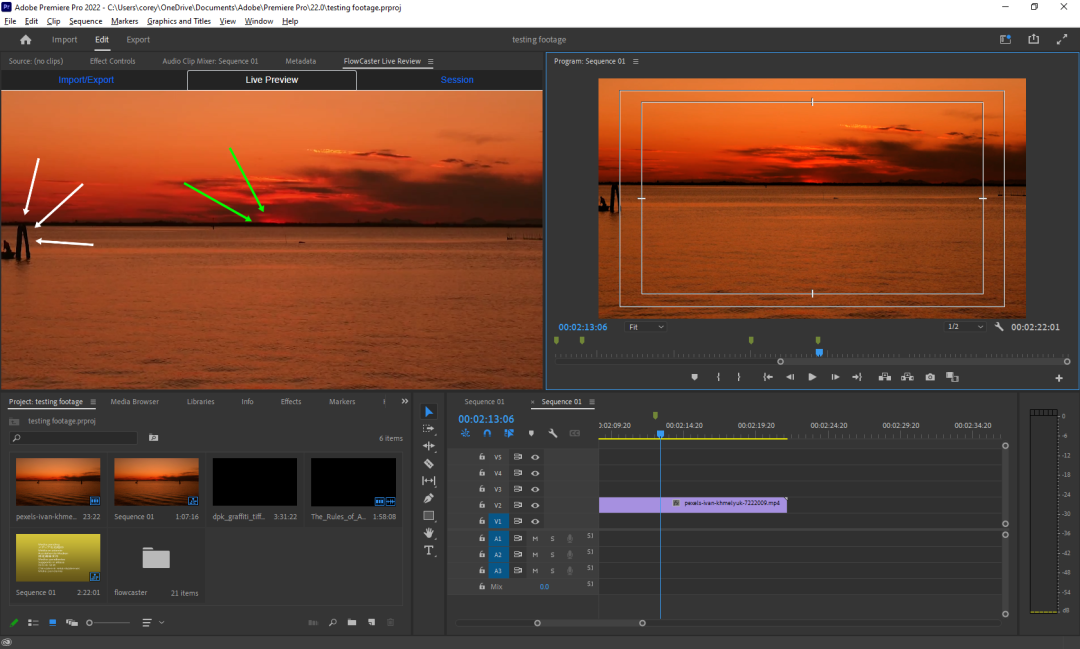
In Adobe go to Edit | Preferences | Playback, and click on the Flowcaster Transmitter Setup control. Set the Transmit Type to WebRTC (the arrow below), and enter the Meeting ID, or Session URL (circled in red below) from the web session you have running.
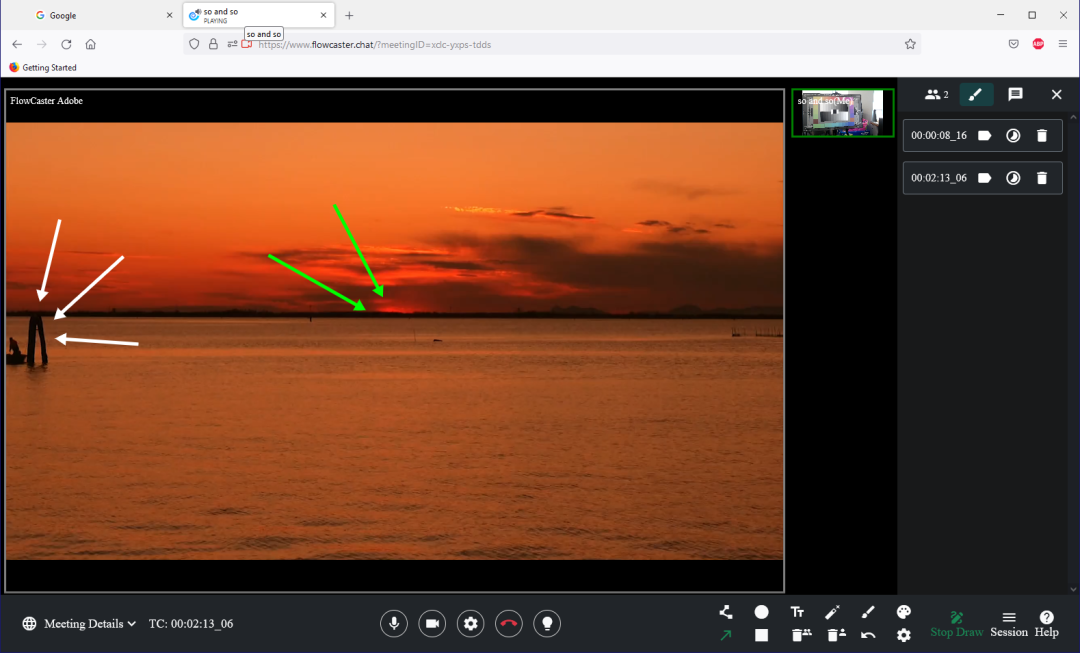
The editor will join the session, and you should start seeing video from your timeline on the web page. In the below image, an editor has added some drawings.
Load the panel from Windows | Extensions | FlowCaster Live Review.

You will be prompted to sign in with your email, gmail, etc.
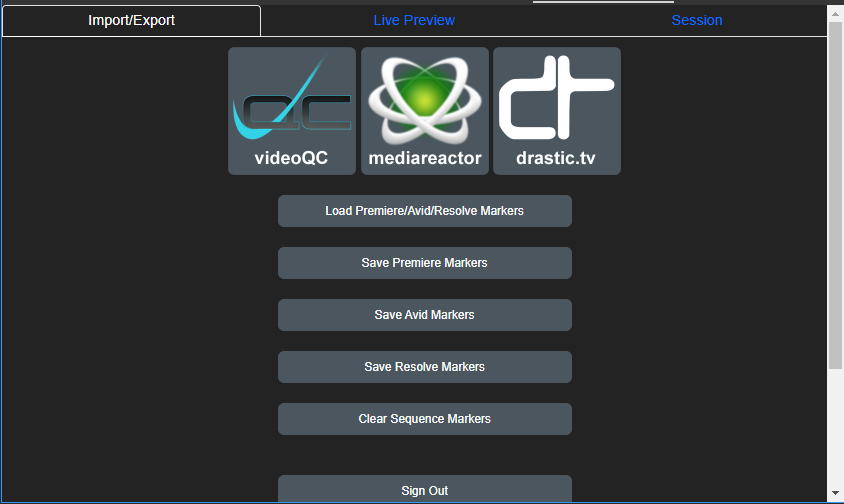
Click on the Session tab, and enter the Meeting ID (everything in the URL after the equals sign) to Join the session. Click the Live Preview tab to view the session directly in Adobe Premiere.
Once the session is complete, click the Import/Export tab. In this area, existing session markers can be imported for use in a review and approval workflow. Also session markers from the current session can be exported for use in either a Premiere, Avid, or Resolve editor. Finally, any session markers that have been loaded can be cleared.
-
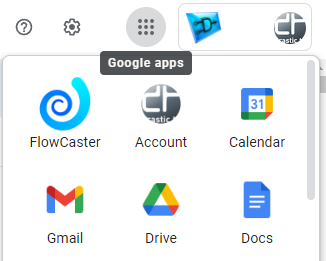
How Do I Use the FlowCaster Chrome extension for Google?
Drastic Technologies has implemented a FlowCaster integration with Google applications such as Gmail and Calendar.
The FlowCaster Chrome extension for Google provides quick and easy access to FlowCaster Live's group review, meeting and approval tools. Our extension provides a quick start icon in the toolbar to start a new meeting/group review, or schedule on on your calendar. Within the calendar edit dialog, flowcaster.live links can be inserted to set up FlowCaster meetings in the future as part of the calendar event.
The FlowCaster Chrome extension for Google is available as a quick download from the Chrome web store. Run Chrome and go to the following link:
To add the extension, press the Add to Chrome button
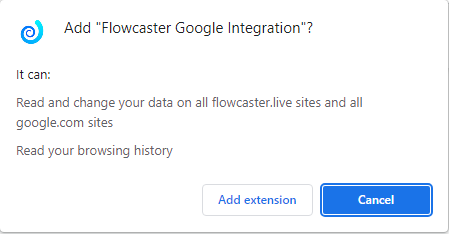
You will be prompted as to whether you would like to Add FlowCaster Integration.
With the prompt, you should be aware that the plugin does need to read some information, to know where you are at in your calendar, gmail, etc., but it cannot save, transmit, or do anything to the data.
What can FlowCaster do in your Google Products?
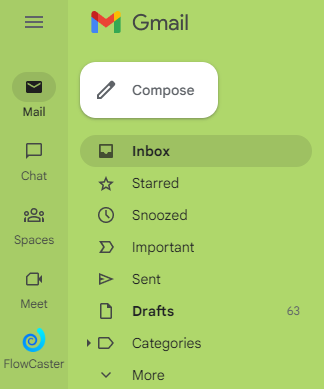
The FlowCaster Extension for Chrome lets you open a FlowCaster session directly from your gmail or calendar.
Open your Gmail, and you should see the FlowCaster link right beneath the Meet link.
When you click the link, your inbox will display a FlowCaster splash. Clicking the New Meeting button produces three options: Start a FlowCaster meeting Now, Start and email a FlowCaster meeting, and Schedule a FlowCaster meeting.
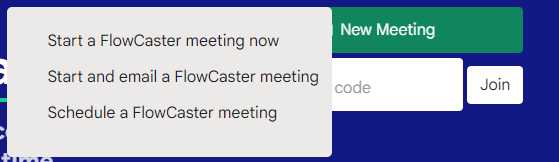
Selecting Start a FlowCaster meeting now opens a new tab with a FlowCaster session.
Selecting Start and email a FlowCaster meeting opens a new tab with a FlowCaster session, and opens a new email with the session link so you can send the invite to others. The subject line of the email is Please join my FlowCaster.live meeting.

If you select the Schedule a FlowCaster meeting option, a new tab is opened, set to your calendar, where a new event is being created. You can easily add/invite contacts, set notifications, visibility, permissions and so on.
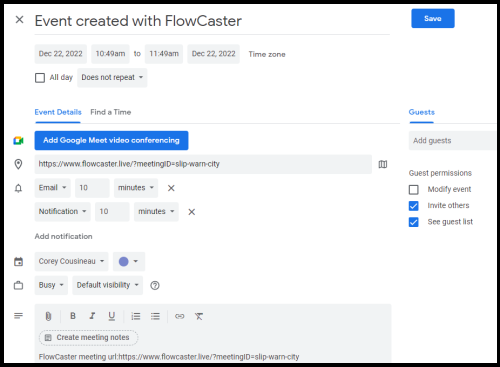
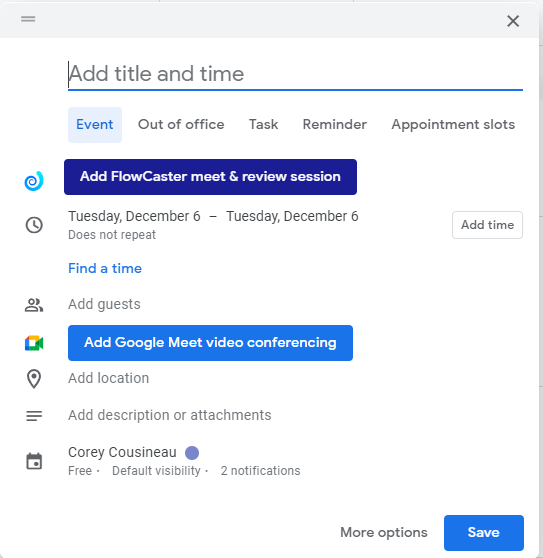
You can also open up your calendar and set up a meeting from there.
Using your google calendar, clicking on a day opens up a new event. With our google integration, a link has been added to quickly set up a FlowCaster session. Click the button labelled Add FlowCaster meet & review session.
You will also notice FlowCaster has been added to your Google apps. Clicking on the FlowCaster icon will open a new tab set to FlowCaster.live so you can immediately start a session